Wednesday, November 30, 2011

T-Shirt Edging: Part 2, One Side Done

I guess I'm not updating as much as I should be for this project. I'll get to the details soon; I don't have much to talk about. Sales are practically non-existent in the shop right now. I am offering free and reduced shipping right now. It started as a Black Friday/Cyber Monday thing, but didn't help, so I decided to keep it for now.  I keep getting my shifts shuffled around at work lately. This isn't completely bad-I do get tired of the same thing week after week. Though it does mix me up a bit. Came home completely exhausted yesterday and didn't get anything done except sleeping. But anyway, I do have a few things to show you.

I have one sleeve done. I don't know if I did it right, but it looks good to me.


As you may (or hopefully may not) see, I decided to go against the rather overwhelming advice of not using invisible thread, and used invisible thread. It wasn't that difficult to use. It did catch on the tatting during the sewing process, but I'm sure cotton thread would do the same.  I was careful to anchor the thread securely in and over a convenient hem. Once finished, I anchored the thread securely inside a convenient hem. I also sewed the ends from the tatting inside a hem as well. Once I have sewed the other edging on, I will wash the shirt once or twice to see how it holds up. BTW, I did wash both the tatting and the shirt before sewing them together.

That's about it really. I hopefully will finish the second edging tonight-it should have been done days ago, but I guess I'm getting tired of it. Combined, the edgings are about 28 inches long; not huge, but this is the longed piece(s) of edging I've ever tatting. I'm getting in the mood to tat some Windmills motifs. Till next time.


Tuesday, November 15, 2011

Tatting Tea Tuesday: T-Shirt Edging, Part 1

Yup, you read the title right. It's Tuesday. I've been tatting. And I'm drinking tea. Well, it's iced tea. Iced Earl Grey tea actually.  Made using the Tassimo coffee machine I HAD to get. That's what I keep telling myself. Anyway, I wanted to do a quick post about the edging I mentioned in my last post. Due to a thread breaking on the snowflake-not related to damp thread or anything-I stopped working on the snowflake and started my edging. Actually, I think the problem I'm having with thread breaking is that my tension is too tight. This makes the rings hard to close, and I end up breaking the thread. I experimented earlier with careful control of my tension which reduced the problem. I forgot to mention it in my last post. While I can (and will eventually) reattach the thread and continue tatting the snowflake, I have set it aside for now. I really what to start this edging project. I don't expect to run out of thread, but I wanted to allow enough time to order more thread if necessary. And possibly other threads. And a couple of those cool looking thread holders. Perhaps a few more shuttles....

Anyway, I picked a pattern for tat, and started it last night. I picked Mary Konior's Convolvulus edging pattern from her book Tatting in Lace.


And here it is against the T-shirt I selected:


I think it works, but I want your opinion. I still have a few questions about sewing it on the shirt. Thanks to everyone who commented on my last post. I greatly appreciate it. I understand that I should use a matching colour thread to sew on the tatting, but what am I matching the thread to? The t-shirt or the tatting? I assume the tatting. The general consensus of the people who commented was that I want a pattern that has few decorative picots. This pattern has no decorative picots. While I'm sure it will make sense once I start sewing it on, but how exactly do I sew it on? Hopefully I haven't bitten off more that I can chew!

You might have noticed the shuttle in the first photo. It is my newest Pop-a-Bobbin shuttle. It is made out of Olive wood. I love it! I love how it looks marbled. And surprisingly (or maybe not so much) it smells like olive oil!? Before you ask, I don't normally smell my shuttles, but the odour was noticeable as it was warming up after being in the mailbox for a few hours. It's actually kinda nice. I don't like olives, but I have recently started using olive oil in my cooking so I have grown accustomed to it. I can't wait to see what other woods Sally and Nick get their hands on. I'm already looking forward to the Zebra wood that Sally recently showed off.

That's it for now. I will post again soon. Now that I finally memorized the pattern, I am tatting this pretty quickly. Apparently, I can't follow written patterns anymore-I had to draw it out first. The current length is about doubled what is shown above, and I'm one or two motifs away from completing about half the required length. So, if anyone sees a problem with the pattern or thread colour, please comment ASAP. Till next time.


PS: Diane, please take a number!

Saturday, November 12, 2011

Cintamani Snowflake: The Next Snowflake

Well, I seem to have disappeared again. At least I have some tatting to show. I've got nothing really new to report since my last post. It snowed here last Sunday. I locked myself out of my truck last Sunday as well-don't ask. The snow started to melt later on in the week. We got a bit more snow last night. I can't use four wheel drive right now since I had to change a tire before it snowed and my spare is a little smaller than the other tire. I really have to get my other tire fixed. Sales have slowed down in my Etsy shop, which gives me more tatting time. I don't expect too many sales for the Christmas season; I haven't seen a huge increase in sales during this time in previous years.

Before I get to the tatting, I do want to clarify something that I mentioned a few post ago. This is regarding tatting with damp hands being a cause for the thread to break. I should say that the thread probably won't snap just because it is damp. As others have mentioned, tatting with damp thread is a littler tougher since the thread sticks and just wants to be difficult. I don't know about the rest of you, but when a ring won't close, I pull harder. When I pull harder, the thread will probably break. I have found, lately, that if I can't close a ring I set it aside for 20-30 minutes. I seem to be able to close the ring much easier. I don't know why.

I promised another tatted snowflake, so here it is:

This is Cintamani, the 5th snowflake from Jon's new book. I tatted this in Lizbeth size 40 thread in colour #166 Pink Cocoa. I still don't know why I bought this thread. It looks so feminine. It looks so delicious. So decadent. So ........, um, I don't know why but I suddenly crave chocolate and raspberries.

Finally, due to a recent post by 
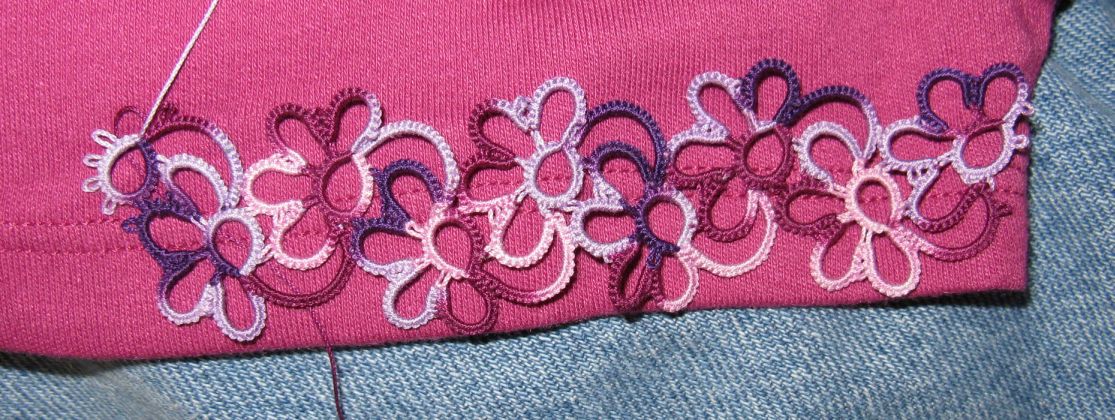
Fox about adding a tatted edging on a jacket, I have decided I want to try tatting an edging onto a t-shirt for my mom. I haven't decided on a pattern yet, but I do have the shirt and what I think will be a good thread to use.


I haven't done this before, so if anyone whats to comment with some hints, I'd greatly appreiciate it. The shirt has a bit of stretch in it; hopefully that won't be an issue. At this time, I only plan on adding an edging to the sleeves, but we'll see how quickly this comes together. I'll definitely provide updates on this project. I may need to change the thread if needed (it's Lizbeth 20 in colour #129, Purple Splendor). I'll start working on this as soon as I'm done the snowflake I'm working on right now.

That's it for now. Hopefully I can post again soon. Till next time.