Showing posts with label Pop-a-Bobbin Shuttle. Show all posts

Monday, February 18, 2013

Finally! Female Betta Completed

Well, I finally finished the Female Betta. It's not like it was that difficult, I just haven't had much time. I've been busy at work, and I haven't been feeling like tatting much when I get home or am off. I have been playing games on my iPad and reading books and magazines on it too, which has taken up a fair amount of my time. But anyway, I have finished tatting the Female Betta.

As I said above, it wasn't that difficult to create, as I used the same body as the male. The fins were much easier to make too. Especially the tail fin. Here's a photo of the Female:


See? The fins are smaller and less ornate than the male. The colours can vary like the males, though perhaps not as much. Here's a photo of both Male and Female Bettas together:


Don't they make a lovely couple? Now that the easy part is done. The easy part being the tatting, I am now working on writing up the pattern. I'm almost done, I just have the top fin to write out. I hope to have it finished by the weekend, maybe earlier. I should have enough test tatters from my call last time, if they're still interested. If needed, I'll ask for extra test tatters when I finish the pattern. The Male Betta is just about done. I need to tat it once more, then add some in-progress photos for clarity. A little bit of reformatting would be good too. I am getting tired of this project, so once the Female is done I'll probably combine both designs in one pattern for sale. I haven't done much other tatting, and I need to move on.

Finally, I'll show you my newest shuttles. I got these two Pop-a-Bobbin shuttles the last time Jane offered them for sale. Which is getting to be a while ago now.


The top shuttle is made out of Eucalyptus wood and the bottom one is made out of Sequoia wood. I love them both, though I love all my Pop-a-Bobbin shuttles. I guess while I'm writing here, I might as well share my newest tatting book too:


The book is in French, as you can probably tell. I'm not sure what it is with foreign language books and me lately. I do have some knowledge of French, so I can understand some of what is written. Not enough though, but I do find it easier to translate than my German and Japanese books. There's quite a few really cool looking designs and patterns. Hopefully I will try some of them soon.

That's about it for now. Hopefully I can get both patterns finished. And some other tatting done to share. Till next time.

Monday, June 25, 2012

My New Shuttles, And Some Tatting!

Sorry. I've been meaning to post earlier, but it just didn't happen. I was dealing with some work issues last weekend, so posting wasn't going to happen then. Some tatting did happen, however, but we'll get to that later. Nothing really new to share otherwise. It's hot here right now. I'm hoping for a thunderstorm, but I'm not being too hopeful; we didn't get one yesterday either. I'll move on, it's too hot to write out a long post.

I teased you last time with the pair of unfinished Pear wood Pop-a-Bobbin shuttles. Well, they're finished now. Or as finished as they are going to get.


They didn't quite turn out the way I wanted them, but whatever. They're blue!!!! In case you're wondering, I used a water-based stain to colour them. The front one, is lighter than the back one as I had added some white stain to the blue (the bottle says "Azure") stain. The darker one is the straight Azure stain. I guess if I wanted the colour different, I should have painted them. However, I wanted the grain to show through, so painting was out. What do you think?

As I said, I have been tatting a fair bit lately. Mainly to keep my mind off of the work issues. I didn't really know what I wanted to tat, so I eventually settled on a WIP from a loooooog time ago. You can see it here. If you follow the link, you'll see that I started the doily over two years ago. I'm not done yet, but here is a photo to show my progress:


For those of you who didn't follow the link to the original post this is Mary Konior's Spinning Wheel doily from Tatting With Visual Patterns. I'm using Lizbeth size 20 thread in colour # 117 Country Side. I should point out, I was about half done the tatting when I picked it up again. Since the end is near, I'm going to keep working on the doily. I will post again once I'm done. I'm really hoping that the doily centre I used is the right size. Once finished the doily should measure about 10 1/2 inches in diameter.

That's it for now. Like I said above, I'll post again once I'm done the doily. I'm hoping the new tatting book I ordered will  have arrived by then. And I'll be inspired to tat something new. Till next time.


Sunday, June 10, 2012

Paracord Bracelets, Tatting Shuttles, and a Tatted Bookmark

I'm back. I guess it took me longer to decide what to tat than I thought it would. And surprisingly, most of the tatting was done today. I'm sure some of you are aware that a journalist was looking to talk to young tatters, 30 or younger. My name and email address was forwarded to her and she made contact this morning. While hesitant, I gave her my phone number and began waiting. I worked on a bookmark I started over a week ago. She called and we had a really nice chat. I was quite refreshed to hear that she didn't think tatting was just for women. I won't go into much detail. It will probably be 2-3 weeks before the article is published. After talking to the journalist, I continued working on the bookmark. I guess talking about tatting inspired me to tat.

Before I get to the tatting (you knew this was coming), I'm going quickly show you what else I've been working on. As I mentioned in my last post, I found a couple of ebooks on iTunes that were about "Manly" crafts. One of the crafts that inspired me were bracelets made out of paracord, which is a shortened name for parachute cord or 550 cord.


I've only made two of them right now. The two-toned blue one is a little too small for me while the camo patterned one fits about right. Due to the way they are made, sizing is a bit difficult. I only purchased a few colours of cord, though I do plan of purchasing a few more. I had thought of putting a few up for sale in my Etsy shop, but I'm not sure if they'd sell. I haven't been brave enough to see how many other paracord bracelets are currently for sale, and I'm not sure I want to. I would like to make a belt for myself using a double wide version of the pattern used for the bracelets. If anyone is interested by all means leave a comment, I may be persuaded to list some in my shop. Or we could work something out privately. I'm not sure how much paracord related things you will see from me. Although, the cord can be tatted with, in case you're wondering. I had to try.

Several weeks ago, I purchased a pair of Pop-a-Bobbin shuttles "direct from the source", ie: from Sally. I bought them unfinished as I had a plan. Here is the before shot:


They're both pear wood, as you can see. I'm about half done with them right now. I have to pick up some supplies tomorrow that I forgot to get earlier. You'll have to wait until they're done to see them. I'm not telling you exactly what I did to them yet. I will say that Diane may be interested. Oops! I may have said too much.

Finally, what you all are waiting for: the bit of tatting I managed to do. Here it is:


This is "Jane's Bookmark" designed by Jane from South Africa. I'm not sure if the pattern has a name, so I named it. It was pretty quick to tat. As I'm not a big fan of tassels (though I don't mind them on bookmarks), I chose to end it with a lock stitch chain followed by a short section of the pattern. The thread is Lizbeth size 20, colour #606 Charcoal. I will have to tat this pattern again. Now that I'm done the bookmark, I'm back to not knowing what I will tat next. I have several WIPs that I should work on and a "WannaTat" list as long as my arm and then some. I probably won't start anything tonight as bedtime is nearing.

That's it for now. Hopefully I'll get the shuttles finished and have something else tatted by next weekend. I will try and post again once the shuttles are done. I do hope they turn out as awesome as I envision them. Till next time.

Tuesday, November 15, 2011

Tatting Tea Tuesday: T-Shirt Edging, Part 1

Yup, you read the title right. It's Tuesday. I've been tatting. And I'm drinking tea. Well, it's iced tea. Iced Earl Grey tea actually.  Made using the Tassimo coffee machine I HAD to get. That's what I keep telling myself. Anyway, I wanted to do a quick post about the edging I mentioned in my last post. Due to a thread breaking on the snowflake-not related to damp thread or anything-I stopped working on the snowflake and started my edging. Actually, I think the problem I'm having with thread breaking is that my tension is too tight. This makes the rings hard to close, and I end up breaking the thread. I experimented earlier with careful control of my tension which reduced the problem. I forgot to mention it in my last post. While I can (and will eventually) reattach the thread and continue tatting the snowflake, I have set it aside for now. I really what to start this edging project. I don't expect to run out of thread, but I wanted to allow enough time to order more thread if necessary. And possibly other threads. And a couple of those cool looking thread holders. Perhaps a few more shuttles....

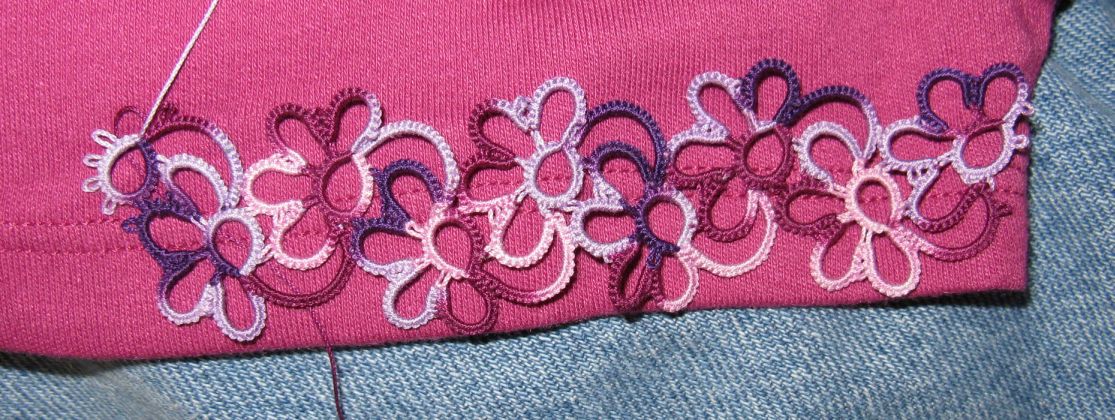
Anyway, I picked a pattern for tat, and started it last night. I picked Mary Konior's Convolvulus edging pattern from her book Tatting in Lace.


And here it is against the T-shirt I selected:


I think it works, but I want your opinion. I still have a few questions about sewing it on the shirt. Thanks to everyone who commented on my last post. I greatly appreciate it. I understand that I should use a matching colour thread to sew on the tatting, but what am I matching the thread to? The t-shirt or the tatting? I assume the tatting. The general consensus of the people who commented was that I want a pattern that has few decorative picots. This pattern has no decorative picots. While I'm sure it will make sense once I start sewing it on, but how exactly do I sew it on? Hopefully I haven't bitten off more that I can chew!

You might have noticed the shuttle in the first photo. It is my newest Pop-a-Bobbin shuttle. It is made out of Olive wood. I love it! I love how it looks marbled. And surprisingly (or maybe not so much) it smells like olive oil!? Before you ask, I don't normally smell my shuttles, but the odour was noticeable as it was warming up after being in the mailbox for a few hours. It's actually kinda nice. I don't like olives, but I have recently started using olive oil in my cooking so I have grown accustomed to it. I can't wait to see what other woods Sally and Nick get their hands on. I'm already looking forward to the Zebra wood that Sally recently showed off.

That's it for now. I will post again soon. Now that I finally memorized the pattern, I am tatting this pretty quickly. Apparently, I can't follow written patterns anymore-I had to draw it out first. The current length is about doubled what is shown above, and I'm one or two motifs away from completing about half the required length. So, if anyone sees a problem with the pattern or thread colour, please comment ASAP. Till next time.


PS: Diane, please take a number!

Thursday, September 29, 2011

A Little Tatting, New Shuttles, and a New Temari Ball

I've been trying to do more tatting. I really have. However, I have been preoccupied with something since last Saturday. Something tragic. You see, the set-top box for my IPTV service died. I'll give you a moment to mourn. OK, I realize it may seem weird for me to feel this way. But, I do love TV, even though it's not really good to watch too much. I do a lot of my relaxation activities-tatting, chainmaille, etc, while watching TV. I can't focus on whatever it is I'm doing without having the TV on. I can watch what I'm doing while glancing at the TV regularly. In case you're wondering I got sick of watching movies by Sunday night. I started going to bed early too. Over the air TV wasn't an option, since Canada recently switched to digital TV, and I didn't have a compatible antenna. I do now. Finally on Wednesday, a Sasktel technician/installer was able to come out and replace my box. While we were waiting for the box to upgrade its firmware and reboot, the Sasktel guy got fascinated by my carnivorous plants and I spent the time showing the plants to him. So after all that, I have my TV again, and all is well. And that is why I have little to show.

I did manage a little tatting. However, I don't have the item finished. I had a heck of a time with the pattern. It's not the patterns fault; it was one of Jon's new snowflake patterns. It was me. I kept joining to the wrong picots, and made many other errors. I also had to deal with the thread I used snapping several times. I think it was three times in the small amount of tatting I accomplished. I'm sure some of you are wondering, so I will mention that I was using Lizbeth thread, size 40. I don't blame the thread. All three times, the thread snapped while I was closing a ring. I'm sure the last stitch became unflipped or something. To make myself feel better about it, I'm going with the idea that I'm becoming much stronger.

It occurred to me that I haven't shown you guys my newest Pop-a-Bobbin shuttles. So, in an attempt to show both them, and the pitiful amount of tatting I've done, here's a photo:


The front shuttle is made of Purple Heart, and the back shuttle is Mahonia wood. Jane assures me that the colour is natural. The colour of both shuttles is amazing. Now, if only there was a tree that produces naturally blue coloured wood. I might sit down and continue with the snowflake. I started another project, using Lizbeth size 20, so if all goes well, I should have a more substantial amount of tatting to show the next time.

Finally, I finished another Temari ball. This one I started a while ago, but set it aside when I had issues with it not being perfectly round. I did manage to divide it up the best I could. Here it is:


This one is called Buckles and Bands. It's similar to one I did earlier, see here, though I like this one better. If you'd like to try making a Temari ball yourself, the designer, Barbara B. Suess, has several patterns available for purchase (including the one above) here. She is also the author of the book Japanese Temari: A Colorful Spin on an Ancient Craft, I love this book and it's great for beginners. I used a styrofoam ball for the core again, and that may be why I didn't get the ball perfectly round. I'm going to try to make my own cores, called mari, using dryer lint, and cloth scraps (separately). I'll be sure to share when I get around to doing this.

That's it for now. With any luck, I'll have a significant amount of tatting to show you. Till next time.


Sunday, May 16, 2010

Not Alot of Tatting Goin' On

I had another week where I didn't get much tatting done. I really tried. I did manage some early in the week, but I got sidetracked with other projects.

You may be wondering what I was working on if I wasn't tatting. Well, this:

It's a chainmaille bag, often called a dice bag. I finally decided to make one, and honestly, I'm quite impressed with it. While it was fairly easy to make (bear in mind that I am working my way up to making a chainmaille shirt for myself-maybe; we'll see), I'm not sure if I will be making these for sale. Unless someone wants one; it does make a cute tatting bag, if lined and/or you place small cloth bags inside it. Which is what I did:

You should be able to see a red coloured thing through the chainmaille. That would be the Poke Proof Pouch I bought from Jane Eborall a while ago. Might have to buy a few more. Anyway, the Pouch is in my dice bag for a reason. And here they are:

Yup, I have a couple more Pop-a-Bobbin shuttles in my possession. The light one is made out of Cedar, and the black one is Ebony. I love them!!! Sally has a nice story on her blog about some cedar wood she got from a local church. I've been wondering if my cedar shuttle was made out of it. Maybe Jane or Sally could let me know. I'm still on Jane's list for a Coco bola Rosewood shuttle; hopefully it will still be possible. Anyway, they both work great. And, the hooks seem a little different. A little more refined, perhaps. They're still made by Sally's husband, Nick (you all may know him better as "I'm in the garage", but it seems weird for me to call him that; I mean, if I had a garage, I might have that name too). Mind you, I may have gotten better at using the hooks.

And finally, we come to the small amount of tatting that I managed to make this week.

This edging was made from a pattern that Mark, AKA, Tatman shared on several tatting list a week or so ago. In a way, we were his test tatters. The way the pattern was written caused it the curve severely. Six repeats would make a circular motif. I made a few modifications to make the edging straight. It's very pretty, though the large rings at the bottom were kinda a pain in the butt to close since they are so large. I used Lizbeth size 20 in colour number 663 for the edging.

I haven't done much else in the way of needlecrafts. I have, however, been working on a few projects of the culinary type. I've been making cheese! That's right, every weekend for the past month, I've made a small (~2 pounds in weight) block or wheel of cheese. Nothing fancy; the first three were simply called "basic hard cheese". I also made some Feta cheese (which tastes great by the way). This weekend, I made some "Stirred Curd Cheddar". I've got some photos, if your interested. What's that? You want to see them. Here they are:


The Feta is in the jar on the left. The cheese on the right is the Cheddar I made this weekend. It has to air dry for a few days, then it needs to be waxed. I then have to age it for at least two months. Fortunately, the other cheeses that I made will be ready before this one. In case you're wondering, the Cheddar recipe is from the book Home Cheesemaking by Ricki Carroll. Ricki has a website where you can buy the book, and other cheesemaking supplies. The basic cheese and feta recipes are from this website.

That's it for now. We'll see what happens on the tatting front. Hopefully I will get a significant amout of tatting done. Till next time.


Sunday, March 7, 2010

Pop-a-Bobbin Shuttle, Tatted Filet, and Hope Butterfly

Here we go, another Sunday night. I'm amazed at how fast the year seems to be going by. I was playing around in my home automation software this afternoon (I was looking for its calculated sunrise time), and discovered that spring (the Vernal Equinox) is only 13 days away. I just hope we actually get spring this year. Though, so far I'm not complaining; we reached a high of 5 degrees C today. That's right PLUS 5. Actually, it's been above zero for most of the past week. I had a window open all afternoon, letting in some fresh air. I should probably go close it now.

On the tatting front, I am the proud owner of a Pop-a-Bobbin shuttle made by Sally's husband. Here it is, made out of Cherry wood:


These are really awesome shuttles. I am really glad that someone came up with an Aero-like wooden shuttle. These shuttles even use Aero bobbins, so it's easy to move the shuttle from project to project. Which is nice, since I only have one, right now anyway. I've already informed Jane (Sally's, um, distributor, and sister) that I am interested in getting an ebony one and one made of cocobola rosewood. Of course, Sally keeps showing off new kinds of wood on her blog; she recently mentioned getting some cedar (with a really interesting story behind it), that I may want a shuttle from as well. I really enjoy using this shuttle, which is about the same size as an Aero, only a bit thicker. The only thing I'm not sure about is the hook. Sally and her husband couldn't find any hooks to use without cutting up crochet hooks, so Sally's husband (not sure what his name is; Sally? Jane? Anybody?) made some himself. From my somewhat limited testing (I've only made one motif using the shuttle, another one is in progress) I have come to the conclusions that for normal to large size picots, the hook works quite well. However for small to very small picots, the hook is less than ideal. I'm going to keep using it though; maybe there's a special technique that needs to be used for optimum performance. If I can't get the hang of it, I may have to replace it though (I do that to my regular Aeros as well). And I think any additional shuttles I (may) get will have to be hookless, but with a hole for a hook. However, all in all, I have to say Bravo to the Kerson's for making a super wooden Aero facsimile.

This brings me to the first motif I tatted using my new shuttle.

This is a part of Mary Konior's Filet Panel from Tatting With Visual Patterns. You may not notice, but towards the end I was playing around with the rings inside the block to see if I could make them fit a bit better. I reduced the stitch count a bit for the last few rings. I used Lizbeth size 20 thread in colour #656 Dark Wedgewood to make the motif. It measures about 2 1/4 inches square (well, it's almost square). I think I'm going to free tat an edging onto it and then I'll count it as part of my Challenge.

Finally, as the title mentions, I tatted Sherry's Hope Butterfly:

Personally, I think I did a terrible job at tatting this beautiful butterfly. The pattern isn't hard, but I still had issues. The problem I found is that Sherry has a different notation/diagram style than I'm used to. I discovered this problem when I was test tatting for Sherry. I guess that means I'll have to tat more of Sherry's design so I learn her pattern writing methods. Thread stats: I used Lizbeth size 20 colour #656 Dark Wedgewood and #663 Dark Bright Turquoise. I think I tatted Hope last weekend, but didn't show it. This is motif #21 of my Third Challenge.

That's it for now. I really have to get back to movie watching and tatting. Till next time.