Hi all! I know I haven't been here much. I've been mostly on Ravelry lately, working on knitting and crochet projects. I'm also posting on Instagram here.
Just stopping by to let everyone know my patterns are online again! I think I forgot to repost them after I had difficulties with my previous hosting site. I have them on my personal Dropbox now. I have added a separate page for my patterns called "My Patterns". The link is just under the left of my page banner. Let me know if you have any issues accessing the files. Hopefully I'll post something tatting related soon! Till next time.
PS: Check out this blog: Prairie Lace Tatter. I did an interview with her!
Monday, July 27, 2020
Sunday, May 13, 2018
Still Alive
I'll make this quick. I keep meaning to post, but never seem to have the time. I've been mostly knitting for the past four months or so. I did do a little bit of tatting a few weeks ago, so that's what I'll start with for now.
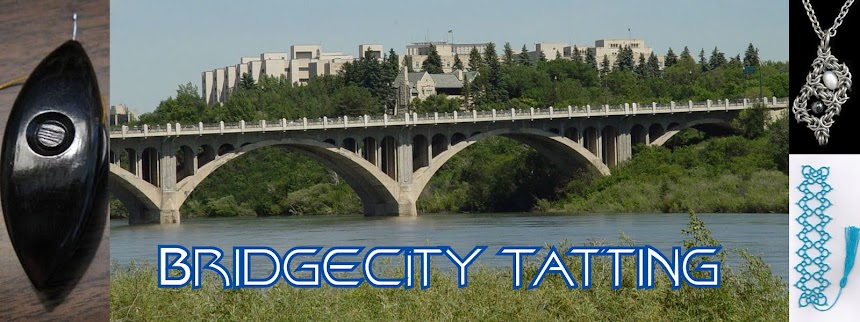
Like many tatter out there, I bought several balls of the new Liz Metallic thread shortly after it came out.
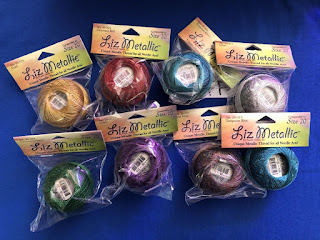
I decided to make a bracelet using it.

The pattern is adapted from one in the Korean book Tatting Lace With Your Life. Its part of the pattern Retro Stripe, square C. The book has a diagram to make the bracelet. I wanted it on the wide side, so I made two strips. I was going to tat three stripes, but since the metallic thread is a bit thicker than a size 20 thread, two was enough. The bracelet is about 1 1/2 inches wide. I have to say, I really like the Liz Metallic thread. I might have to buy more, I only got 8 of the colours available. Fortunately, there is a Canadian vendor of Lizbeth that I'll probably buy from. My only issue with the thread is how it's packaged. Handy Hands isn't kidding when they say the thread doesn't stay on the ball. It unwinds very easily. I can't help but wonder why they chose to wind it into balls and not onto spools like all the other metallic threads available.
That's it for now. I have lots of stuff to share, mostly knitting, but some crochet and chainmaille. I just have to take pictures of everything.
Like many tatter out there, I bought several balls of the new Liz Metallic thread shortly after it came out.

I decided to make a bracelet using it.


The pattern is adapted from one in the Korean book Tatting Lace With Your Life. Its part of the pattern Retro Stripe, square C. The book has a diagram to make the bracelet. I wanted it on the wide side, so I made two strips. I was going to tat three stripes, but since the metallic thread is a bit thicker than a size 20 thread, two was enough. The bracelet is about 1 1/2 inches wide. I have to say, I really like the Liz Metallic thread. I might have to buy more, I only got 8 of the colours available. Fortunately, there is a Canadian vendor of Lizbeth that I'll probably buy from. My only issue with the thread is how it's packaged. Handy Hands isn't kidding when they say the thread doesn't stay on the ball. It unwinds very easily. I can't help but wonder why they chose to wind it into balls and not onto spools like all the other metallic threads available.
That's it for now. I have lots of stuff to share, mostly knitting, but some crochet and chainmaille. I just have to take pictures of everything.
Sunday, November 19, 2017
Playing Catchup
I didn't mean to disappear again; it just kinda happened. I finished tatting a magic square for my mom. I also worked on some crochet for my mom as well. For the last few months, I have been working on a knitted cardigan for me. I'm working on the second sleeve, so it shouldn't take me too much longer to finish. Then I can get back to tatting for a while- I haven't tatted for a few months! Oh, and I updated my last post to include the author's name of the Korean tatting book. I received a comment on that post from someone who knew the author's name. Thanks Mary!
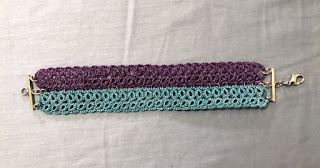
I made another Magic Square Triangles Variation by Robin Perfetti. This one was made for my mom.
 This was tatted using Flora thread in colour #s 64 and 213, size 20. Man, do I miss Flora thread! It is such a nice thread to use. I don't know why Handy Hands replaced it with Lizbeth. One of the threads is variegated, the one I used for the chains. I'm not sure I totally like how it worked out, but I think my mom liked it which is what counts.
I also made a crocheted jewelry bowl for mom. I think it turned out quite well.
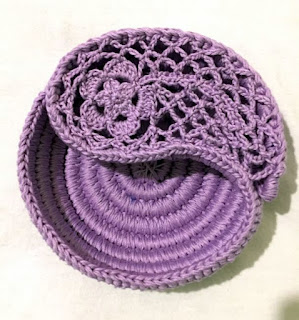
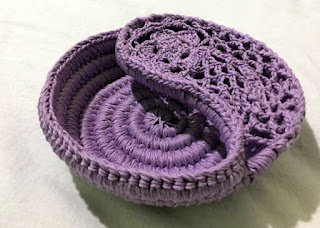 It is crocheted over a 1/4 inch thick rope using four strands of sock weight yarn. I used three strands of sport weight yarn, Omega Sinfonia, and it still worked out. The pattern is by goolgool and you can find her Etsy shop here. I really enjoyed making it and will have to get the proper yarn to make another one, or two. The pattern is written a little weird but it was still pretty easy to follow.
As I said, I am currently working on a knitted cardigan for my self. I have to finish the second sleeve, which I hope to do either today or tomorrow. Then I have to sew the sleeves on, and knit the collar and front bands. A zipper sewed under the front bands should complete it. I'll post a photo when it's done. That's about it for now. Till next time.
I made another Magic Square Triangles Variation by Robin Perfetti. This one was made for my mom.

I also made a crocheted jewelry bowl for mom. I think it turned out quite well.


As I said, I am currently working on a knitted cardigan for my self. I have to finish the second sleeve, which I hope to do either today or tomorrow. Then I have to sew the sleeves on, and knit the collar and front bands. A zipper sewed under the front bands should complete it. I'll post a photo when it's done. That's about it for now. Till next time.
Tuesday, August 15, 2017
Magic Squares and a Korean Book
I have to say, it feels awesome not having to work on the Monster Doily. Yeah, I am so happy to have it finished. Don't get me wrong I am pleased and proud of myself for finishing tatting it. It was just so....big. Thank you to everyone for the comments. I appreciate each and every one of them. Keep'em coming! I will post a better photo of the Monster after it's been blocked, along with other info-finished size, thread information, etc.
I started tatting one of Robin Perfetti's Magic Squares (Triangles Variation). You can find the pattern in her Etsy Shop here. I started tatting the pattern back during the beginning of the year while I was avoiding the Monster Doily, er, taking a break. I initially was going to tat the "Option 1", or a small square version, but once I had tatted half the square, I decided to turn it into the "Option 2" square.

I think it turned out quite well. Once you learn the pattern, it tats up pretty quickly. I did make a few mistakes though. I forgot to join several picots. Instead of retro tatting or cutting off the errors, I just tied the picots together after. This is just a test piece anyway, as I really didn't care for the thread I was using. It is DMC Babylo, size 20. It's not a bad thread, I just found it pretty soft to tat with. It will be great for some crochet projects I plan on working on soon. The square measures about 5.5 inches, um, square. I'm working on anther one right now.
Finally, I got a new tatting book! It is one I've wanted for awhile, though, I haven't seen much blogged about it. It is a Korean book called Tatting Lace With Your Life by Ha Mi- Kyeong. Thanks Mary Victoria for the author's name.
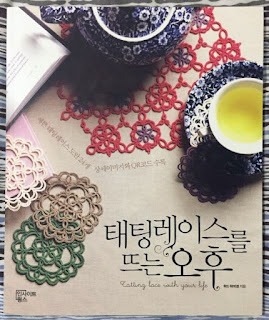
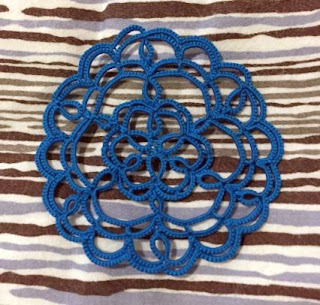
I chose a small motif to tat from this book. This motif is called "One of the pleasures". It was nice and quick to tat. I started tatting it Sunday morning, and finished it Sunday evening. After the Monster Doily, it was nice to start and finish a tatting project in the same day. As you can the see, the motif is on the front cover of the book. I need to tat it again, as the picots in the centre are too big, and causes the motif to lose it's round shape. After tatting with the DMC Babylo for the previous project, I found the Lizbeth thread stiff. The motif is rather stiff too. I guess I need to loosen my tension a bit. The motif is about 2.75 inches across. Thread stats: Lizbeth size 20, colour #?. I put the ball of thread away, and don't want to look for it right now.
That's about it for now. I have to get to bed. I'll try to post again soon. Till next time.
Monday, August 7, 2017
The Monsterpiece Doily: Fini!
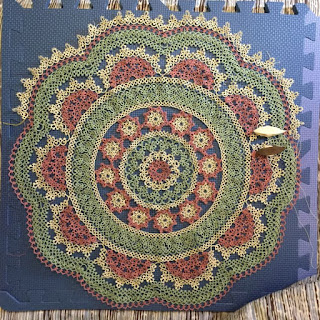
I honestly thought I'd never be able to announce the end of the Monsterpiece doily. I was sure I'd run out of the green thread, and couldn't finish round 18. I wound all the thread from the ball onto all the clover bobbins I had since I would need to use two shuttles to tat the final round. I was keeping track of how many repeats I could tat for each shuttle, and my estimates said I would probably run out. I finished tatting the doily this afternoon and didn't run out. I had about 14 inches of thread left. It's shown in the first picture below.
I thought about posting earlier. But I kept tatting. I actually started getting bored with the doily last weekend, and was constantly getting distracted with other things I was finding online. Anyway, I don't want to make this a really long post, just a quick update. Here is the finished doily!
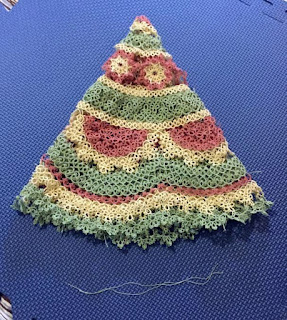

Well, I guess I should say I'm finished tatting it. I have a lot of ends that need to be trimmed (from joining thread, and ends hidden with magic threads). There is also at least one thread that needs to be sewn in, the result of a forgotten or failed magic thread-not sure which. It should be washed then blocked as well. I can get an accurate measurement then too. I think I have a place for it as well so it won't have to be hidden away. For the most part, I enjoyed tatting this doily. Yes, I had some issues with it. Mostly stupid errors I made and had to fix. I know I made a few mistakes in the final round but due to the thread shortage chose to leave. I would definitely tat another one of Jan's patterns. Probably not this one again.
That's about it for now. I will be moving on to other projects. I started one of Robin's Magic Squares earlier in the year that I need to finish. I would love to try her new Onion Ring Magic Square pattern too. I have a bunch of crochet and knitting patterns queued up. I won't miss working on the Monster Doily!
Sunday, July 2, 2017
The Monsterpiece Doily: Round 17, Nearing the End!
I'll make this another quick post. I had meant to post earlier, but I guess I've been too busy tatting. Since my last post, I have finished tatting round 16 of the Monsterpiece doily and am over three quarters finished with round 17.
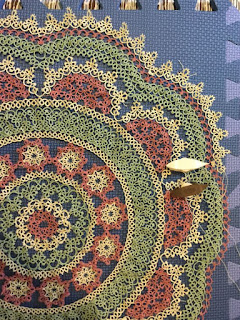
As a bonus, you get a photo of the whole Monster. The photos where taken over a week ago, as I had planned on making a quick blog post, but got distracted and forgot. I am currently working on the eighth scallop. It's kinda weird knowing that the next round will the be last. Thread stats: Manuela size 20, colour #055.
With any luck, I can have this round finished by the end of the week, possibly earlier than that. I can then begin the final round. The end is near!
Sunday, May 28, 2017
The Monsterpiece Doily, Round16: Working My Way Around
I'll make this quick. I finished tatting round 15 of the Monsterpiece doily a few days ago. I have since started working on round 16.
 I'm currently on the fourth scallop, so it shouldn't take me too long to finish tatting this round. As you can see, I'm using one of my new Clover bobbin shuttles. I actually switched to using them on the previous round when I used up all the thread I had prewound on to Aero bobbins and had to refill a few more. I really enjoy tatting with them. I wasn't too sure about the picks as I prefer shuttles with hooks, but with a bit of practice I have gotten pretty good at making joins with the pick. I might have to get a couple more of these shuttles.
Thanks for all the comments on my last post. I really appreciate each and every one. To answer a question, I'm not sure where I will put the doily when it is finished. It will probably be put away until I move into a different place. I do intend on displaying it somewhere. That's it for now.

Thanks for all the comments on my last post. I really appreciate each and every one. To answer a question, I'm not sure where I will put the doily when it is finished. It will probably be put away until I move into a different place. I do intend on displaying it somewhere. That's it for now.
Subscribe to:
Posts (Atom)